

Processes explained
The types of thermoforming
"Thermoforming" is a family of related processes, not one single method. They all start the same way — heat a plastic sheet until it is pliable, form it over a mould, cool it and trim it — but differ in how hard the sheet is pushed into the tool. That one difference decides surface detail, how deep you can draw, and the cost. Here is the whole family, and a simple guide to choosing between them.
Thermoforming is the umbrella term
Everything below is thermoforming. Pick a process to explore it — or read on for a plain-English guide to when each one wins.
Vacuum forming →
Vacuum alone draws the heated sheet onto a single-sided tool. The most economical process — ideal for covers, trays, liners and panels.
High definitionPressure forming →
Adds compressed air behind the sheet for crisp radii, formed-in texture and near-injection-moulded cosmetics at thermoforming cost.
Deep & evenPlug-assist forming →
A shaped plug pre-stretches the sheet into deep cavities so walls stay uniform — combined with vacuum or pressure for deep draws.
When to use which process
Start from what the part has to be. Match your need on the left to the process on the right — then open its page for materials, tooling and design detail.
Each process, up close
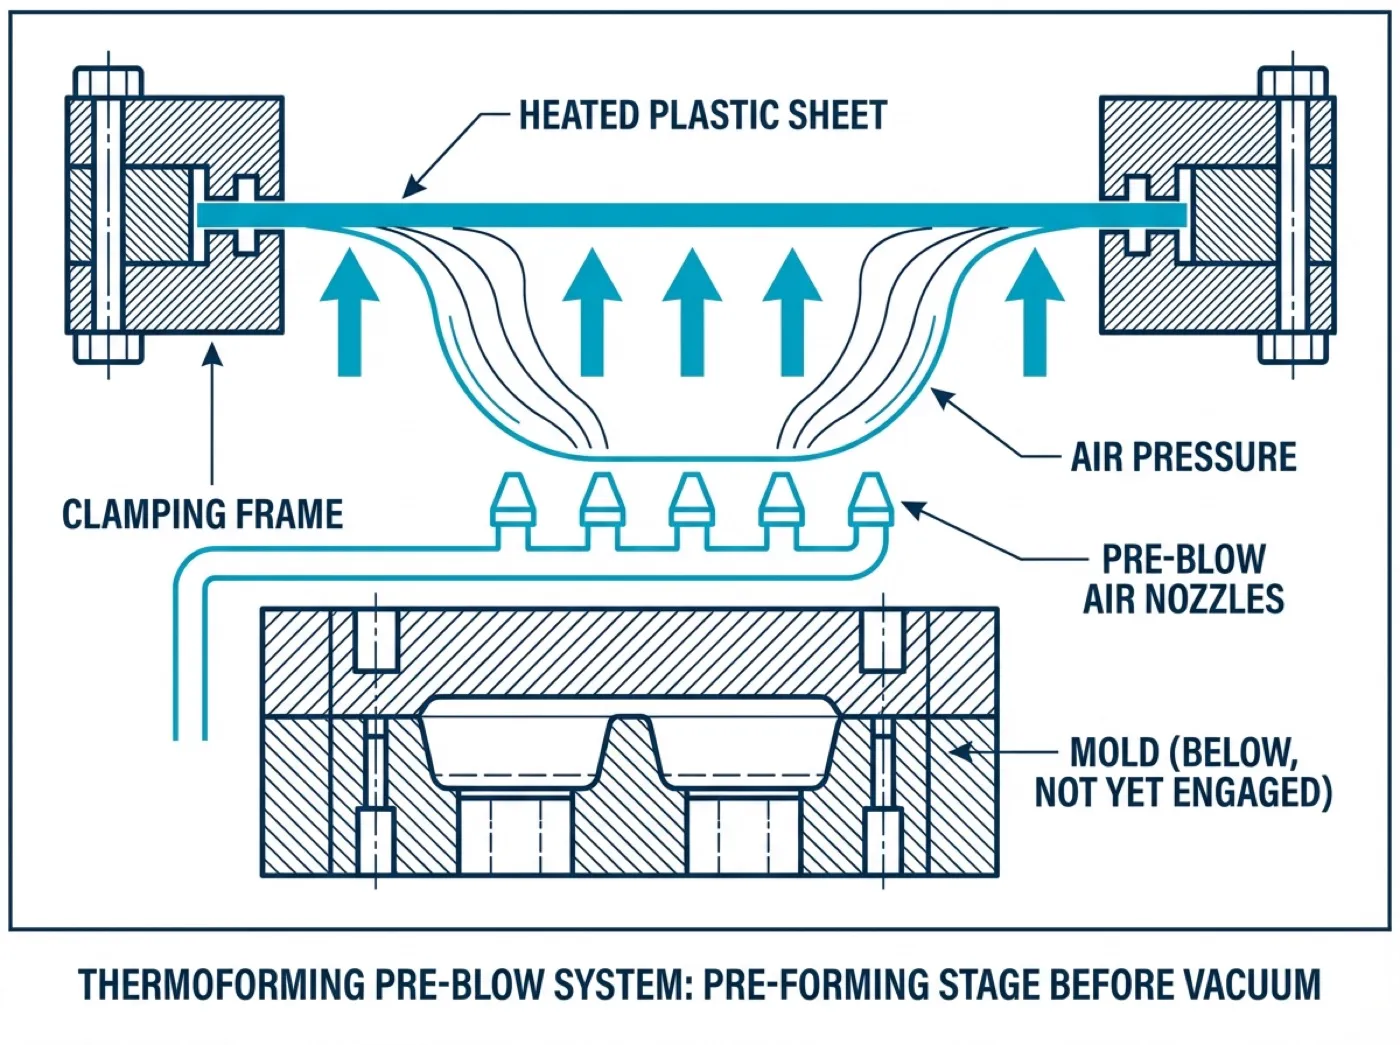
Vacuum forming
The clamped sheet is heated, (optionally pre-stretched with a bubble of air), then a vacuum evacuates the space between sheet and mould so atmospheric pressure presses it onto the tool. Single-sided tooling, low pressure, lowest cost.
Best for: Machine covers, refrigerator & appliance liners, EV and automotive panels, medical and ESD trays, packaging.
Explore vacuum forming →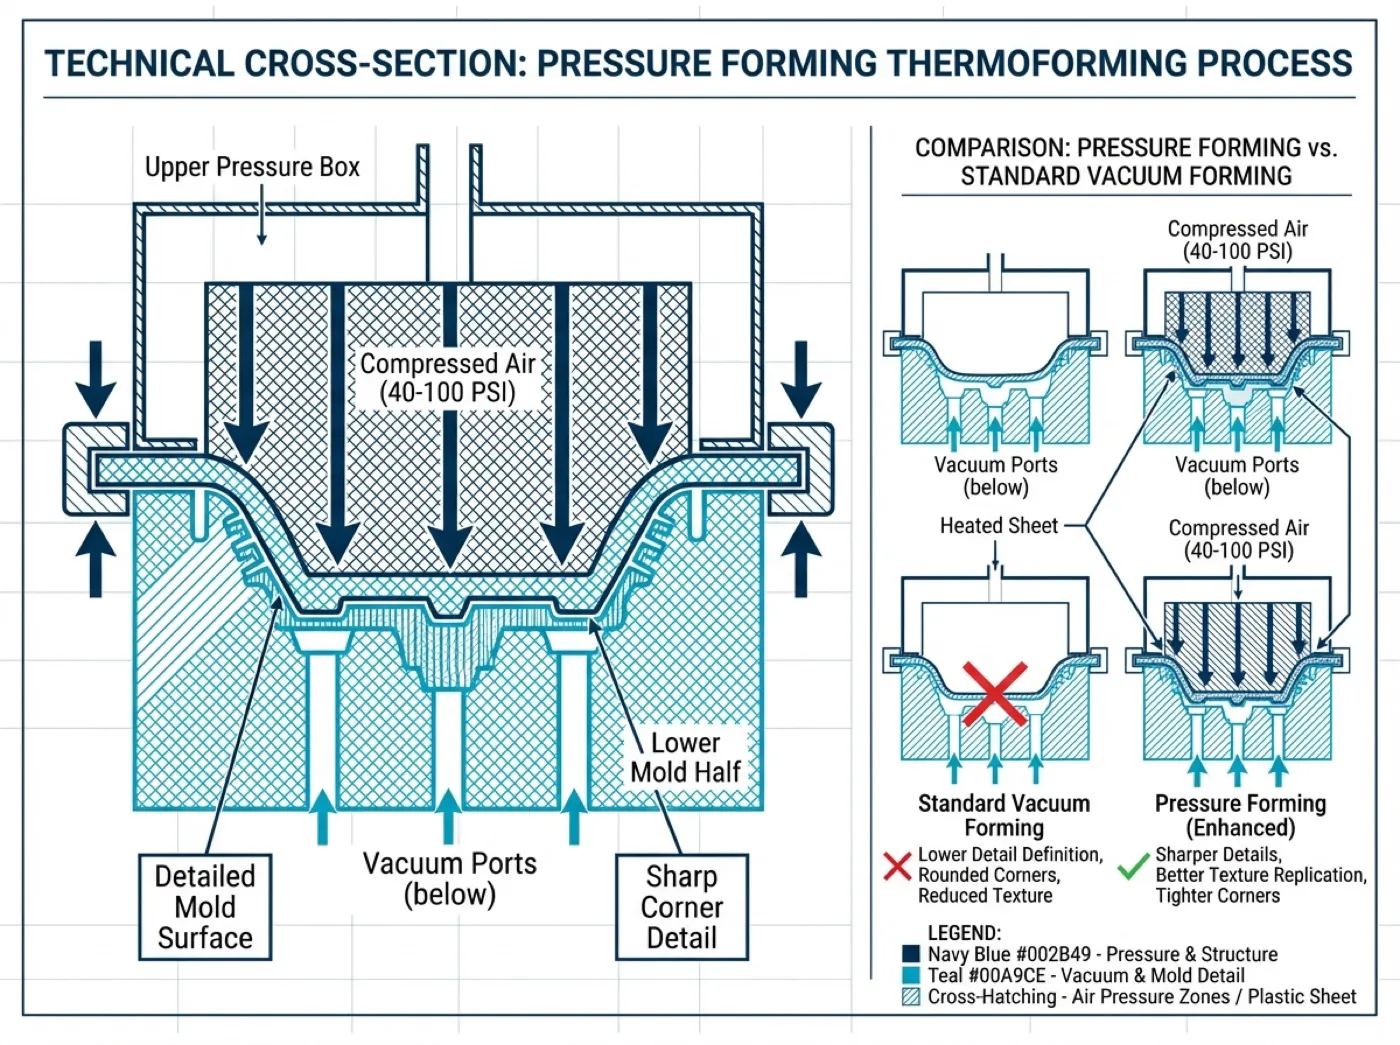
Pressure forming
Everything vacuum forming does, plus compressed air on the back of the sheet at 2–4 bar, forcing the plastic into every corner, texture and detail. The result is sharp radii, formed-in logos and textures, and a surface close to injection moulding.
Best for: Equipment bezels and enclosures, medical device housings, kiosk fascias, premium appliance and EV cosmetic panels.
Explore pressure forming →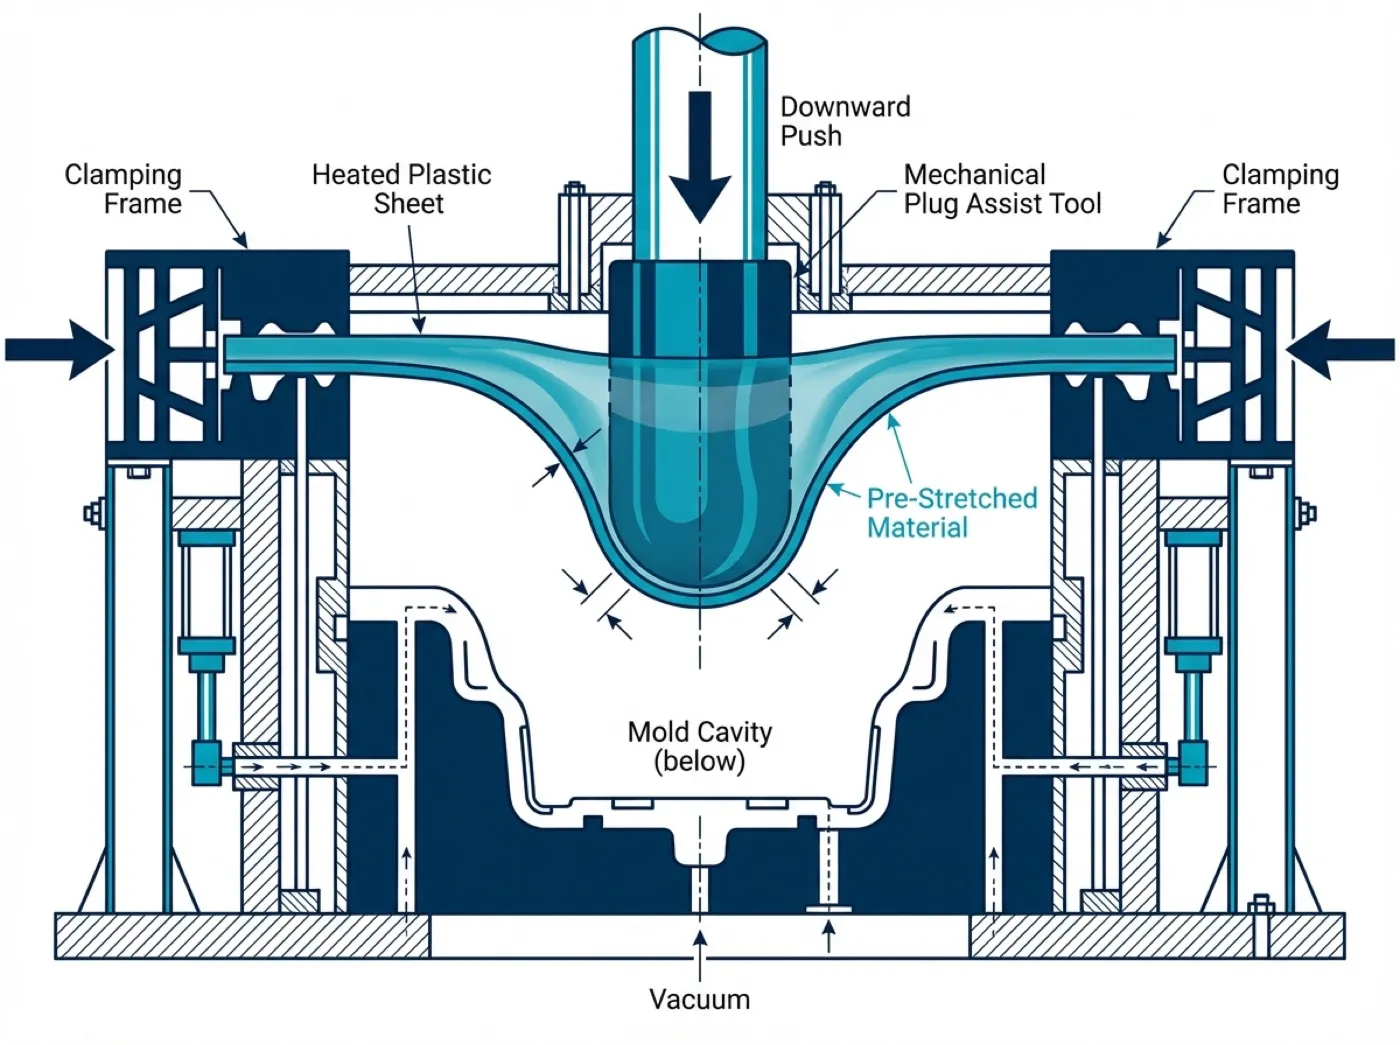
Plug-assist forming
A shaped plug mechanically pre-stretches the heated sheet into the cavity before vacuum (or pressure) finishes the form. It moves material into deep sections so the walls do not thin out on the bottom and corners — essential for deep draws.
Best for: Deep containers, tubs, sinks, deep-drawn liners and any part with a high depth-to-width ratio.
Explore plug-assist forming →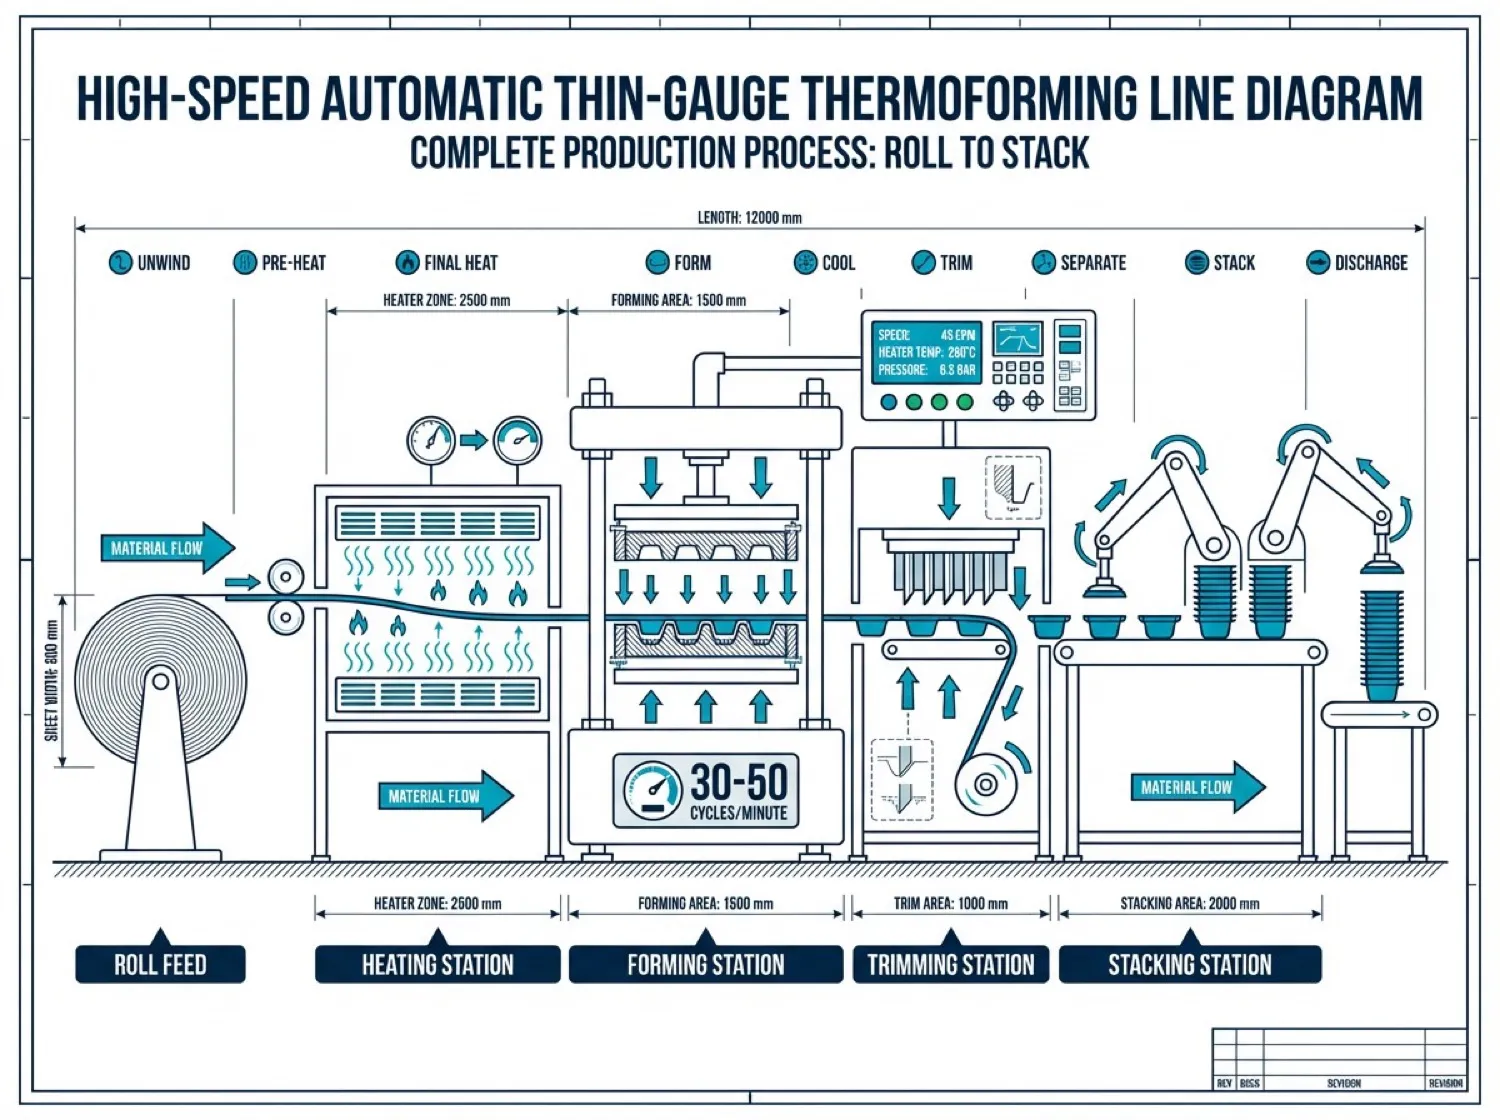
Thin vs thick gauge
A second way to slice thermoforming is by sheet thickness. Thin gauge (0.1–2 mm) is roll-fed and runs at high speed for packaging; thick / heavy gauge (2–12 mm) uses cut sheet for large, durable structural parts. Any of the processes above can run in either gauge.
Best for: Thin: blisters, clamshells, cups, food and pharma packaging. Thick: covers, panels, enclosures, liners, dunnage.
Explore thin vs thick gauge →Types of thermoforming FAQ
Is vacuum forming the same as thermoforming?
No — vacuum forming is one type of thermoforming. Thermoforming is the umbrella term for heating a plastic sheet and forming it over a mould; vacuum forming, pressure forming and plug-assist forming are all thermoforming processes that differ in how the sheet is pushed into the tool.
What are the main types of thermoforming?
The core processes are vacuum forming (vacuum only), pressure forming (vacuum plus compressed air for detail) and plug-assist forming (a plug pre-stretches deep cavities for even walls). Thermoforming is also split by sheet thickness into thin gauge and thick / heavy gauge.
Which thermoforming process should I choose?
Choose vacuum forming for the lowest-cost covers, trays and panels; pressure forming when the part must look injection-moulded; and plug-assist for deep parts that need even walls. Send us the part and we recommend the process, material and tooling.
What is the difference between pressure forming and vacuum forming?
Vacuum forming uses only vacuum and is the most economical option. Pressure forming adds compressed air (2–4 bar) behind the sheet for sharper detail, tighter radii, formed-in textures and undercuts — a near-injection-moulded finish for a modest tooling premium.
Can one part combine several processes?
Yes. A deep, cosmetic part might use a plug assist to distribute material and pressure forming to capture detail, in thick gauge. The processes are complementary stages, not mutually exclusive choices.
New to the process? Start with What is thermoforming? — the complete step-by-step guide.
Is thermoforming the right process?
A 30-second gut-check before you send a drawing. When it fits, thermoforming is faster and far cheaper to tool; when it doesn't, we'll tell you.
A strong fit when you have…
- Large or oversized parts
- Low-to-medium annual volumes
- First parts needed in weeks, not months
- Replacing metal or fibreglass
- Styling still changing between batches
- Single-wall covers, trays, panels & housings
Injection moulding may win when…
- Very high annual volumes
- Small, thick, highly detailed parts
- Solid sections, ribs, bosses or threads
- Sharp detail needed on both faces
Not sure which side you're on? That's exactly the DFM call we make for free.
Cost and volume shown as typical bands — the exact crossover depends on part size, geometry and volume.
Not sure which process?
Tell us the part — we'll pick the process
Send a drawing, STEP file or sample. Our engineers reply with the right thermoforming process, material and a costed quote, usually within 24 hours.
ISO 9001:2015 certified · Most quotes back within 24 hours